A large area of copper theft is from a job site, shortly after new material is delivered. Common items stolen are copper wire spools, copper water pipe, fittings, and light fixtures. Basically anything made of aluminum, copper, or brass that is not nailed down. Most contractors value their tools and secure them in a job box, with cable, or secure storage bin; leaving the recyclable mettle out.
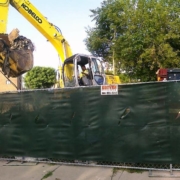
The most common security measure is a temporary fence with a chain around the gate. This works in some places, but most temporary fences have a weak point where they terminate into a wall or building. This joint can often be moved enough for a person to get through. The next week point in a temporary fence is the bottom rail. A 2 man crew can easily lift this fence up enough for the first to slip under, retrieve the wire, and slide it under the fence. At this point, the only thing the fence does, is protect against litigation liability from kids getting hurt on an unsecured job site. The next step can be quite effective, yet expensive.
Security guards can deter many thieves. Simply a marked security vehicle parked onsite is sometimes enough to keep the low grade thieves away. Unfortunately, guards are human and fall into a predictable patrol pattern or even a nap in their vehicle. One guard can only effectively watch one side of your job site at a time. Larger sites require more guards or risk having large sections of the site unprotected for a predictable time. We get regular reports of copper theft from a guarded site. The thieves case the site for one night, learn the guards patterns, then get in during an unguarded window. Judging by the amount of damage, the thieves must have been onsite for some time, then leave during a later patrol gap.
One of the most effective security measure is to lock the new material in a secure building. Commonly the building under construction is not secure by itself, and not a good storage location for material. The next best thing for job site security is a temporary secure storage container. Commonly, this can be a converted sea container, box trailer, or retired service vehicle.
Large jobs that require a large amount of material stored for a good amount of time. A converted sea container is an excellent option. This is simply a used cargo container with added shelving and lighting. Standard locks can be easily defeated but a simple weld or bolt on box can make the container very secure. The down side to this solution is the cost of transporting the containers, and their storage between jobs. This is a sound investment for large contracting companies working on large projects.A retired service truck or box truck can be easily converted for onsite storage. The downside is this vehicle must legally be insured and registered. In many states, trailers have a one time registration fee and no legal insurance obligation; lowering costs. A box trailer that can be left onsite overnight, easily locked, and have many storage configurations to fit any need. The ease of transport that comes with a trailer makes it simple to take from job to job. The trailer can also be wrapped with the company information to serve as a billboard, attracting new clients.
There are many other ways to prevent theft, but these are the most common and effective ways we found. If you have any other products or ways to prevent theft, we would love to share them. Kurtis@LightPoleSystems.com
 Light Poles provide light for our streets, parking lots, sports parks, walk ways, and children. A light pole is something that most people take for granted and maintenance personnel often do not regularly check.
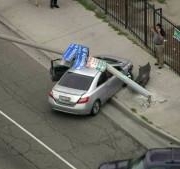 A concrete 20′ street light pole was hit on the side of the road. When hit, the concrete exploded. The pole came down on the Lincoln, poles always find the only car around, caving in the roof and preventing the doors from opening. Luckily, no one was in the car. But if they were, the fire department would need to come, and maybe even need to wait for a crane to come and pick the pole up off the car.
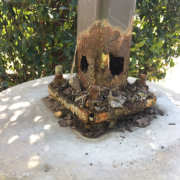 Light poles rust and fall in the middle of a crowded parking lot. When they are installed, contractors pack dry concrete, “dry pack”, under the base of the pole to help support the weight. This traps water in the pole, causing it to rust and fall. Always finding the most expensive car, and fall on that one.
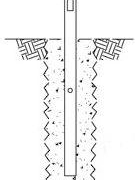 Fiberglass poles can be bolted to a footing or buried directly into the earth, known as direct bury. Direct burial means that the pole is buried directly into the earth, like standard telephone poles. When a light pole is installed using this method, the hole is dug, the pole is set and wired, then the hole is backfilled with the original material or concrete, depending on the specifications of the pole manufacture. This method can drastically lower the installation time when compared to the traditional method of pouring a footing, letting it dry, then installing the pole.
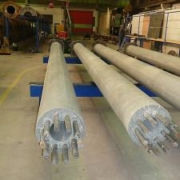
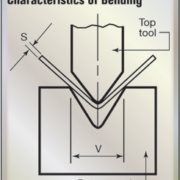 Using a metal breakA top tool presses the material into a matching grove in the bottom tool, bending the material to the desired degree. Bending the steel on a press brake allows the manufacture to quickly switch from 4” or 5” square to octagonal tapered tubing by simply uploading a new program to the machine.
 Because steel corrodes, the poles must be painted, galvanized, or powder coated. Painted poles are the most common due to its low cost and easy process. Powder coating is a high quality coating that can outlast conventional paint, but baking a full pole can be expensive. Galvanizing provides the most corrosion protection both inside and out side the pole and is the most expensive of the coating options.